How to Find All Products Sold by an Amazon Seller
Open any Amazon seller’s storefront, find its seller ID, browse its products by department and export the ASINs to Excel: store research step by step.
To see all products sold by an Amazon seller, click the seller’s name under Sold by on any of its product pages, then open its storefront from the seller profile. The storefront lists the seller’s products and lets you filter them by department. Its address contains the seller ID after me=, which you can use to open the storefront again later.
Why sellers look at other sellers’ storefronts
Looking through a store’s products, often called store research or storefront research, is one of the most common sourcing methods:
- Wholesale and arbitrage: a seller who does well with products like yours often sells more products you can source from the same brands.
- Competitor research: see which categories and brands a competitor is in, and what it adds over time.
- Finding brands and suppliers: a storefront shows which brands sell well for resellers on Amazon.
Step 1 · Open the seller profile
On a product page, find the seller’s name:
- in the buy box, next to Sold by, or
- in Other sellers on Amazon, for the other offers on the same product.
Click the name. The seller profile opens (how to find who sells a product). It shows the seller’s ratings and, for many sellers, the business name and address under Detailed Seller Information.
Step 2 · Open the storefront
On the seller profile, open the seller’s products (the link name changes with the marketplace and the layout, for example Visit the storefront or Products). The storefront is a product list that only contains this seller’s offers.
Step 3 · Find the seller ID
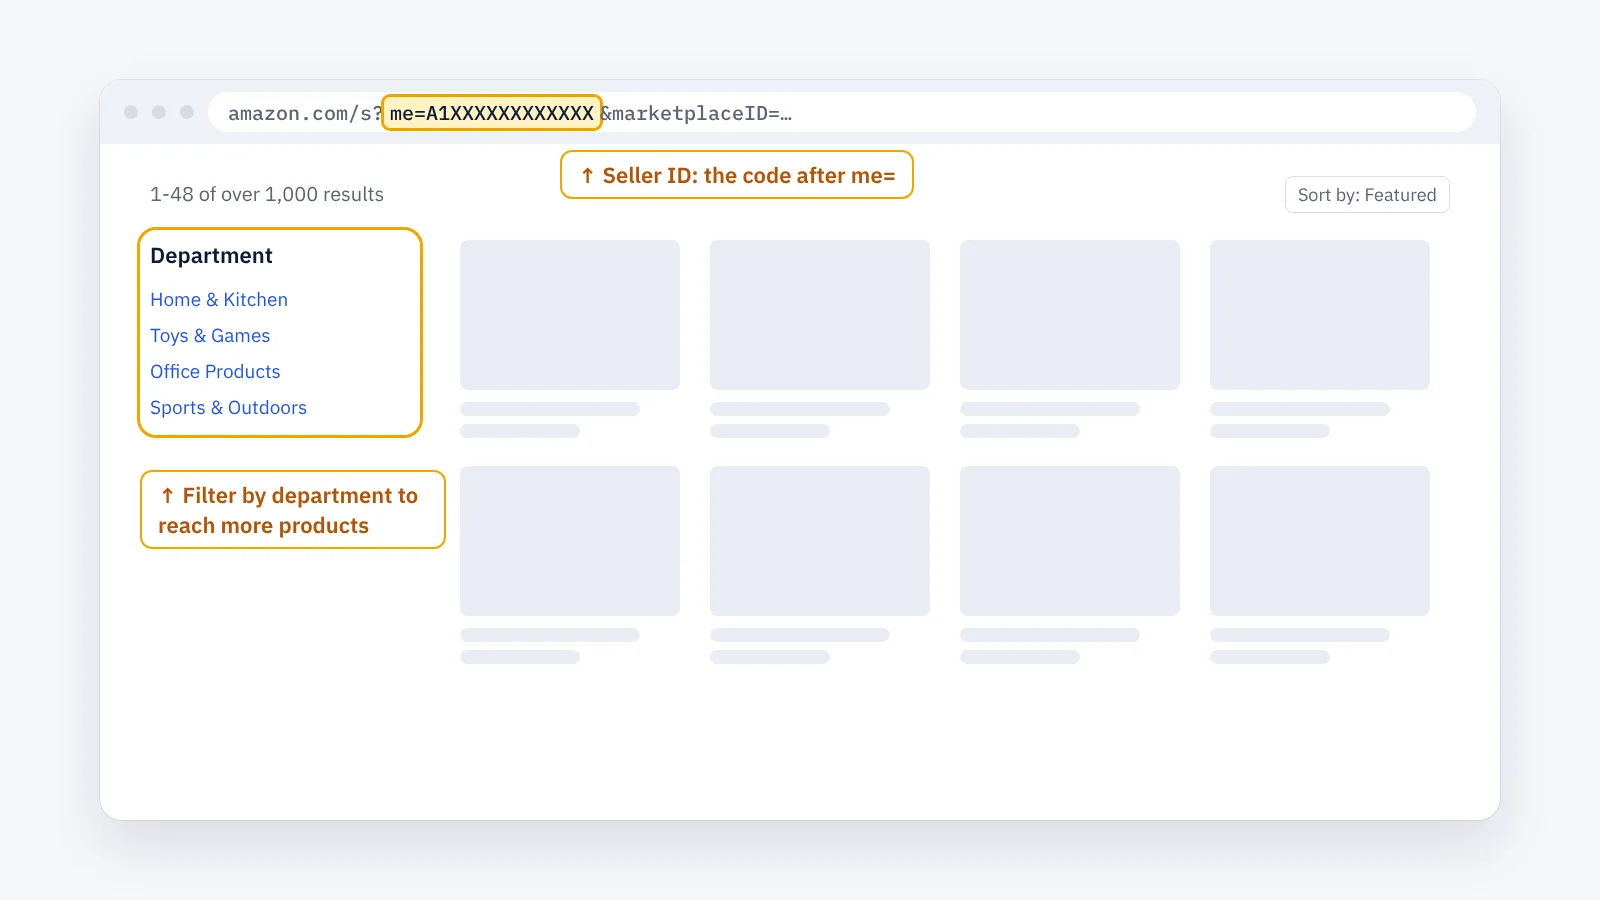
Look at the storefront’s address. The seller ID is the code after me=, up to the next &:
amazon.com/s?me=A1XXXXXXXXXXXX&marketplaceID=…
On the seller profile, the same ID follows seller=. Seller IDs are codes of letters and digits that usually start with A (more on seller IDs). With the ID you can open the storefront again at any time: type the marketplace address followed by /s?me= and the ID.
The seller ID belongs to one seller, but the same company can sell in several marketplaces. Check the storefront in each marketplace you research: its products differ.
Step 4 · Go through the products by department
The storefront lists the seller’s products, and you can filter them by department and sort them. Two things to know:
- Amazon shows a limited number of pages for one list. In a large store you cannot reach every product by scrolling the full list.
- Filtering by department, and then by category inside it, shows products that the full list does not reach. Go through the departments one by one.
Step 5 · Collect the ASINs
For each product you want to keep, note its ASIN: the code after /dp/ in the product’s address (what an ASIN is and how to find it). Keep them in a spreadsheet with the seller ID and the marketplace.
Many sellers use ASIN grabber or ASIN fetcher extensions for this step. Whatever you use, check which pages it really covered: a list taken from the full storefront alone usually misses products.
Step 6 · Check the products worth sourcing
For the products you keep, check the Sales Rank, price, sellers and the Featured Offer, as in Amazon product research.
The faster way: store research with ENSKOM
ENSKOM’s Store Researcher is a Chrome extension that does this in your own browser:
- Seller Discovery: import a list of ASINs and find every seller offering them. New sellers stand out; stores you already know are recognised by their seller ID.
- Sellers: one list of every store, with the marketplaces it sells in and when you last scanned it.
- Store Scans: collect a store’s products category by category, to reach what the full list does not show. Each scan reports what it covered, what you excluded and what needs another try. Nothing is marked complete without proof.
- Export: copy the ASINs or export them to CSV or Excel, or download only the ASINs that are new to you.
The Free plan includes every research feature.
Guides: Seller Discovery · Store Scans · Category presets
FAQ
Amazon seller lookup: how do I find a seller by name?
Amazon has no search for seller names. Find one of the seller’s products and open its profile from there, or use its seller ID if you have it.
What is the difference between a seller profile and a storefront?
The seller profile shows who the seller is: ratings, feedback and often the business details. The storefront lists the products it sells.
Is a seller ID the same as a merchant ID?
Yes. Amazon and sellers use seller ID and merchant ID (or merchant token) for the same code.
Why can’t I see all of a seller’s products in its storefront?
Amazon shows a limited number of pages for one product list. Filter by department and category to see more, and expect a very large store to take a while.
Is the storefront the same as a brand’s Amazon Store?
No. A brand’s Amazon Store is a designed brand page. A seller’s storefront is the list of products one seller offers, whichever brands they are.